

It is strongly advised to exercise caution when considering a firmware update for your device. Only proceed with such updates if absolutely necessary for bug fixing or when a new feature is crucially needed. Firmware updates involve a certain level of risk and can potentially render the device unrecoverable if not executed correctly. It is essential to weigh the benefits against the risks and ensure that the update is vital for improved functionality or security. Before initiating any firmware update, thoroughly review the release notes and guidelines. If uncertainties persist or if you are unsure about the process, seeking assistance from our support team is always a prudent step to avoid unintended consequences and potential damage to your device.
Firmware Recommendation
You have the flexibility to flash your board with firmware of your choice. However, we highly recommend utilizing official Coiaca firmwares to seamlessly leverage Coiaca services such as the MQTT broker, mobile app, and other applications or tools. The latests, previous, and beta firmware versions for each Coiaca device are readily available on this page, at no additional cost. Flashing with unofficial firmwares voids the device’s warranty.
Over the Air (OTA) firmware update
BRDSC01 v2.1 and v4 devices running firmware v1.2.0 or later (units sold from July 15th 2022 onwards) can be updated Over the Air (OTA) without the need of connecting any adaptor. The device should be registered, and Wi-Fi properly configured to perform a successful OTA firmware update. How to know your device firmware version?
If your device is registered, running a Coiaca firmware and connected to a reliable internet connection, OTA firmware update is the easiest way to proceed.
This tutorial serves as a guide for updating to the latest Coiaca stable firmware version and it assumes that the URL configured in the "Update Firmware URL" field on your device is the one that was autoconfigured during the device registration process. However, if you intend to update with a non-Coiaca firmware, you'll need to set up the corresponding URL manually. Similarly, if you wish to update to a Coiaca firmware version other than the latest, it's advisable to use a wired serial adapter. Alternatively, if you still prefer OTA updates, please reach out to our support team, specifying the desired version, and our support team will provide you with the corresponding URL for OTA updating.
1 – Begin by connecting to the device in AP mode and accessing the configuration screen.
2 – Scroll down to the “Remote Update Firmware”. Depending on the firmware version currently running on your device, you will find the option “Enable Remote Update Firmware” or “Update Firmware Now”; set the option YES (or 1 for older versions).
3 – Specify the URL where the firmware to be installed is located. Ensure that it is reachable through the Wi-Fi connection your device is currently connected to. To update to the latest Coiaca firmware version, leave the URL as it came from the factory.
4 – Scroll down and click the Apply button to start the firmware update process.

The device will reboot three times to perform all tasks needed for the update when flashing with Coiaca firmwares, and two times in the case of others.
After this, Coiaca firmware will attempt to connect to the configured MQTT broker through the configured Wi-Fi connection. Depending on the differences between the old version and the updated one, reconfiguring the device may be required.
Flashing firmware with a computer over USB
This section is applicable only to BRDSC01 v2.1, as the pinout for v4 differs.
The following elements will be needed to update the board firmware
- The new firmware .bin file for your board
- 1 USB to TTL adapter
- 1 jumper
- ESPTool software (you will find a download link below)
- A computer with an USB 2.0 port available
Wiring
To perform the update, the board ought to be disconnected from the alarm panel.
You need to connect the board to the computer with a serial (UART) adapter in order to be updated. For doing so you will need a USB to TTL adapter like the one shown on the image.
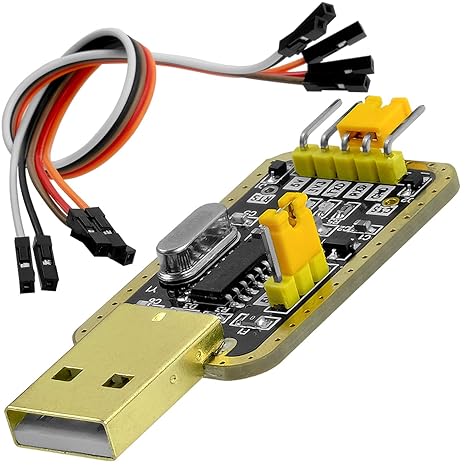
Ifyou don’t have one, you can buy one from our store.
Now, you need to connect the board to the adapter. Identify the PINs and make the followin connections:
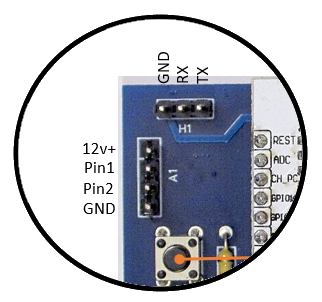
- The PIN labeled as 12v+ on the board to the 5v PIN on the USB adapter
- The PIN labeled as GND on the board to the GND PIN on the USB adapter
- The PIN labeled as RX on the board to the RX PIN on the USB adapter
- The PIN labeled as TX on the board to the TX PIN on the USB adapter
- Use the jumper join J1 PINs
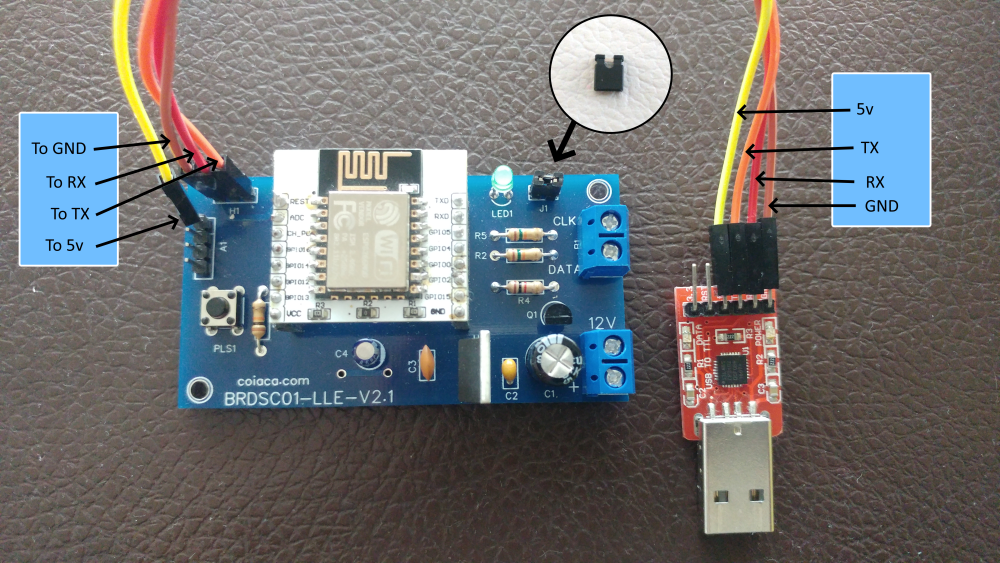
Connections should look like the following picture.
Now, you can connect the USB adapter to the computer.
Running the update
First, you need to know the port the adapter in connected to. You can find it opening the windows Device Manager.
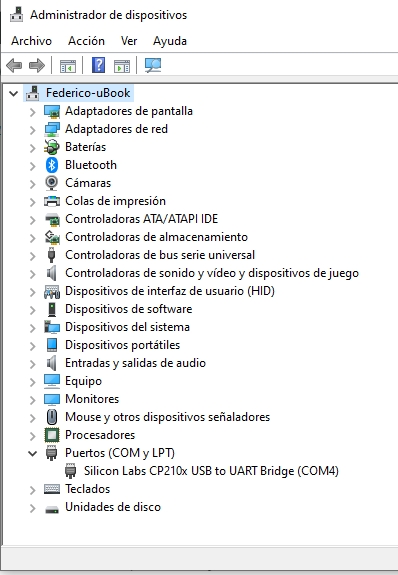
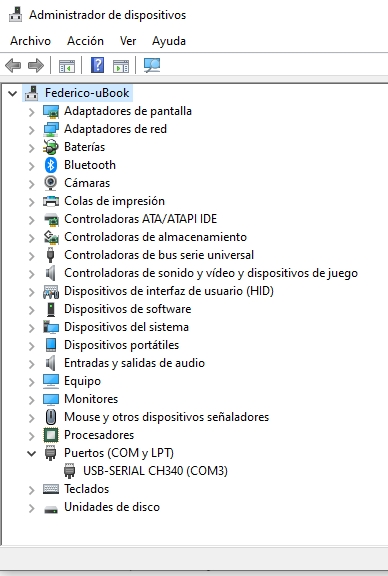
Your adapter should appear under Ports (COM and LPT) section. If you are using the CH340 driver, your adapter should appear as in the image on the right, otherwise like the one at left. Take note of the COM port (COM4 or COM3 in the examples)
Now, it´s time to flash the board.
- Create a folder (c:/esptool, for instance) and save there the esptool.exe file that can be downloaded from this link. (Linux tool can be found in this link)
- Save the firmware .bin file in the same folder
- Open a terminal window (cmd.exe)
- Point to the folder where you put the files in (ex. cd c:/esptool)
- Issue the following command line, replacing the COM port with the one your USB adapter is connected to, and the filename according to your firmware´s .bin file.
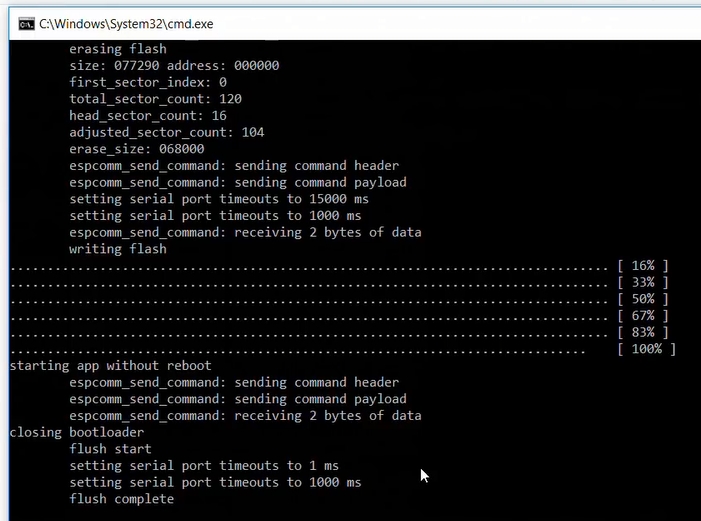
esptool.exe -vv -cb 115200 -cp COM3 -ca 0x00000 -bz 1M -bm dout -cf DSC010000000001_BRDSC_v0.5.4.bin
If the command is issued correctly, the process will start and the firmware shoul be updated. You will notice the flashing process ends when the “flush complete” message appears.
Once the process is complete, you can remove the USB adapter from the computer, unwire the board and reinstall it on the alarm panel. (Don’t forget to remove the J1 jumper)
Be aware that since different firmware versions could have more or less features, configuration parameters may differ between versions and configurations may mismatch. We recoment to review the configuration after flashing, to be sure all parameters are correct.
Issue reported by Macintosh users with CH340 driver
Some Macintosh users have reported that the CH340 driver crash on OSX Sierra and recommends to use the one from this link.
If want to uninstall the driver, follow the following steps:
- Open a terminal and type: cd /Library/Extensions/
- Verify that the .kext file is present: ls | grep usbserial.kext
- Output should be: usbserial.kext
- Then type: sudo rm -R usbserial.kext
- Verify that the .kext file has been removed: ls | grep usbserial.kext
- Output should be empty.
- After you should remove the files stored in receipts folder: cd /private/var/db/receipts/
- Find the enties: ls | grep usbserial*
- Output should be: codebender.cc.ch34xinstaller.usbserial.pkg.bom codebender.cc.ch34xinstaller.usbserial.pkg.plist
- Remove each one of the files of the above list: sudo rm -r filename`