

IMPORTANT UPDATE
Device registration is no longer required for BRDCS01 units running firmware version 2.0 or later (shipped from June 2025 onward)
How to know your device firmware version?
BRDSC01 devices with firmware v1.0 or later (units sold from December 2021 onwards) require registration and initial configuration. How to know your device firmware version?
To begin, please follow these steps:
Once the device is wired and powered on, it will enter AP (Access Point) mode and await connections for 30 seconds. During this period, the green LED will blink rapidly.
1 – Using a Wi-Fi-enabled device (such as a smartphone), scan for available Wi-Fi networks. You will see a network with the SSID (name) beginning with the prefix “Coiaca-”, for example, “Coiaca-DSC01”. Connect to this network using the default AP Password. The default AP password for each firmware release can be found here. For custom firmware versions you can contact the support team, if you don’t have the label that was shipped with your custom unit.
It’s important to note that you can only connect to the device for configuration while the green LED is rapidly blinking during the initial 30-second AP mode window. If you observe the green LED shifting from rapid blinking to a slower pace, it indicates that the device is no longer accepting connections. In such cases, wait until it resumes rapid blinking and then attempt to reconnect. Alternatively, you can reset the device by pressing the PLS2 button to initiate the process again.
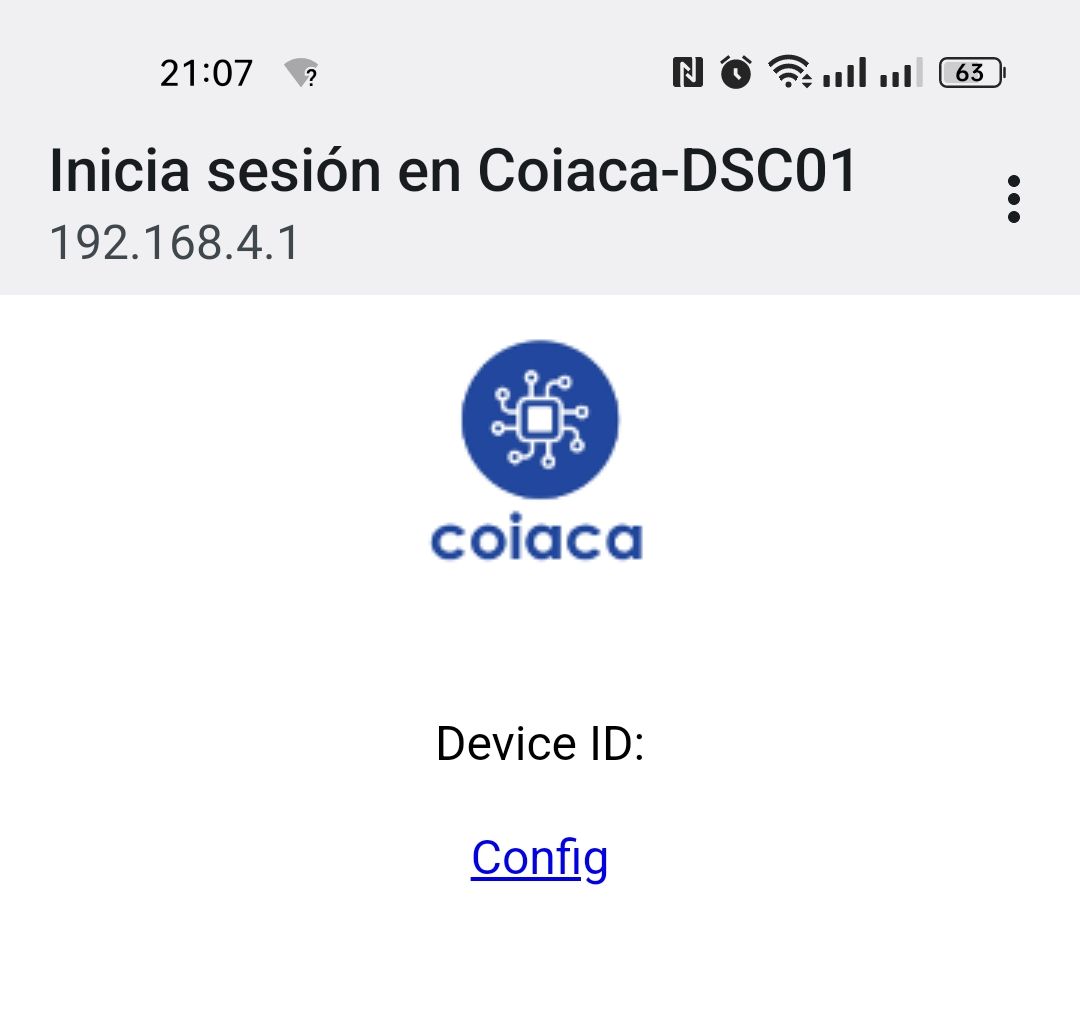
2 – After establishing the connection, you will be automatically directed to the welcome screen. As registration has not yet been completed, no device ID will be displayed. Simply tap on ‘Config‘ to access the configuration screen
3 – Fill out the following fields WITHOUT MODIFYING ANY OTHER PARAMETERS. Once registration is complete, you will have the option to adjust additional parameters and configure the device according to your needs..

Thing Name: This is the identifier for your device and the SSID it will broadcast when functioning as an Access Point for configuration purposes.
AP Password: This password is required to connect to the device when it acts as an Access Point for configuration. It’s mandatory to change this password during the initial setup. Changes won’t be saved if this field is not updated.
Wi-Fi SSID: Enter the name of the Wi-Fi network you want the device to connect to for full functionality. Internet access is necessary during the registration process.
Wi-Fi Password: Provide the password for the Wi-Fi network specified in the previous field.
Email Address: Enter a valid email address where you’ll receive important device information such as the device ID, MQTT credentials, and other relevant details.
Email Address Confirmation: Re-enter the email address for verification purposes.
User Password: Set a password for creating an account to manage and secure your device data.
User Password Confirmation: Re-enter the password for confirmation.
Ensure that the “Update Firmware Now” option is set to NO. Attempting firmware updates before completing the registration process may result in irrecoverable errors.
4 – After filling out these fields, keep the other parameters unchanged. Scroll down to the bottom of the configuration screen and tap on the ‘Apply‘ button to save the changes and reboot the bridge.

After rebooting, the device will automatically connect to the specified Wi-Fi network to finalize the registration process.
Once registration is complete, your device will be ready for use.
You will receive an email from support @ coiaca.com containing credentials and information necessary to access all features and services. If you do not receive the registration email, please check your spam folder. To prevent any data loss, consider adding support@coiaca.com to your contacts before proceeding. If you still do not receive the email, kindly reach out to our support team via email at support @ coiaca.com, specifying the email address used for registering your device.
Configuring your device
If you need to change the configuration of your device, follow these steps:
1 – Reset the device by pressing the PLS2 button. The green LED will blink rapidly for 30 seconds. (For resetting v2.1 devices, disconnect AUX+ as they do not have a reset button)
2 – During this time, connect to the device using the last configured AP password. If you are using the same device that was used during the registration process, the device may still have the default AP password stored. In this case, you may need to delete (or forget) the Wi-Fi network from the device to prompt it to request the new AP password you have set.
3 – Once connected, you will be automatically redirected to the welcome screen, displaying the device ID. Tap on ‘Config‘ to access the configuration screen.
4 – Adjust the parameters according to your requirements. You can refer to the documentation section to determine which parameters need to be configured on your device based on your implementation, integration, and use case.
5 – Scroll down to the bottom of the configuration screen and tap on the ‘Apply‘ button to save the configuration changes and reboot the device.
Related:
– Integrating BRDSC01 with Home Assistant
– Configuring BRDSC01 devices.
Back to Documentation index page