

Coiaca Bridge BRDSC01 can be utilized to integrate your DSC Powerseries alarm system with Home Assistant. This functionality extends beyond merely controlling the panel as a virtual keyboard; it also furnishes Home Assistant with valuable information. This includes details such as the armed or disarmed status, the state of opened or closed doors or windows, and even detecting movement in rooms. Such inputs serve as excellent triggers for automations within your Home Assistant setup.
When integrating with Home Assistant, you have two options: MQTT Discovery or manual configuration.
Given the changes in newer versions of Home Assistant (from late 2023 and beyond), we highly recommend utilizing the automatic device discovery feature. Manual configuration of the Alarm Control Panel integration has been deprecated in recent releases, and it can now only be managed through the built-in integration that incorporates MQTT Discovery functionality. (You can find more detailed information about MQTT Discovery in this link ![]() )
)
Therefore, if you’re running recent versions of Home Assistant or considering updating to the latest release, it’s advisable to adopt this method.
However, if you’re using an older version of Home Assistant or still prefer to attempt manual configuration, you’ll find instructions below.
After completing the registration process, all boards are automatically configured to be controlled with Coiaca Smart App or to be integrated to Home Assistant using Coiaca MQTT broker. Although it's generally not recommended to utilize MQTT brokers outside of your network for home automation systems, we provide this automatic setup using Coiaca’s infrastructure, for those users willing to control the alarm solely through the mobile app, and for those without a MQTT broker in their infrastructure, or have less technical skills. Both options will be covered in this document.
Using your own MQTT broker (recommended)
If you’re moving forward with this option, let’s assume that your MQTT broker is up and running, and the Home Assistant MQTT integration is installed and configured properly. Therefore, you don’t need to make any changes on the Home Assistant side, and the configuration needs only to be made on the bridge.
1 – Begin by connecting to the device in AP mode and accessing the configuration screen.
2 – Scroll down to the “Home Assistant MQTT Discovery” section and ensure that the “Enable Home Assistant MQTT Discovery” option is set to YES, and the “Default MQTT Discovery Prefix” configured as “homeassistant.”
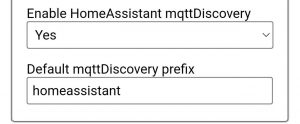
MQTT discovery feature is enabled by default on Home Assistant installations but can be disabled; and the default prefix for the discovery topic is homeassistant but it can be changed. If you have disabled the feature or changed the topic, you should enable the feature and configure the same topic on both sides to make it match.
3 – Scroll down to the “Alarm Configuration” section and fill the “Access Code” field. This is the PIN used to arm or disarm the alarm system.
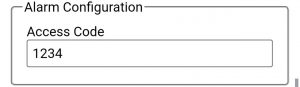
TIP: While it’s not mandatory and you can use the same PIN you use manually on the keypad, it's a good practice to configure a new user code on the alarm system specifically for use with the bridge. This allows to differentiate the usage on the alarm system log.
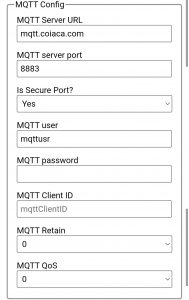
4 – Scroll down to the “MQTT Config” section and replace the values with the ones corresponding to your MQTT broker.
- MQTT Server URL: Your MQTT broker address. It could be an URL or an IP v4 adddress.
- MQTT Server Port: Port to connect to the MQTT broker. (Usually 1883 for unsecured conections and 8883 for secured connections.)
- Is Secure Port?: Whether connection is secured or not. (TLS v1.2)
- MQTT Username: Username for connecting to MQTT broker
- MQTT Password: Password for connecting to MQTT broker
- MQTT Client ID: MQTT connection client ID. Unless you need to change it, we recommend to leave it as it is.
- MQTT Retain: Whether MQTT messages will be published with retain flag or not. 1 or Yes for enabled, 0 or No for disabled.
- MQTT QoS: QoS value to publish MQTT messages.
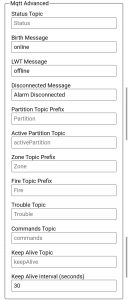
5 – Scroll down to the “MQTT Advanced” section and remove the prefix that is present on the beginning of each topic and topic prefixes fields. These include Status Topic, Partition Topic Prefix, Active Partition Topic, Zone Partition Prefix, Fire Topic Prefix, Trouble Topic, Commands Topic, and Keep Alive Topic.
Topics should resemble this format: “DSC010000000xxx/Zone” instead of “ABCDEFGH/DSC010000000xxx/Zone”.
6 – After making these adjustments, scroll down and click the Apply button to save the configuration changes and make the device restart.

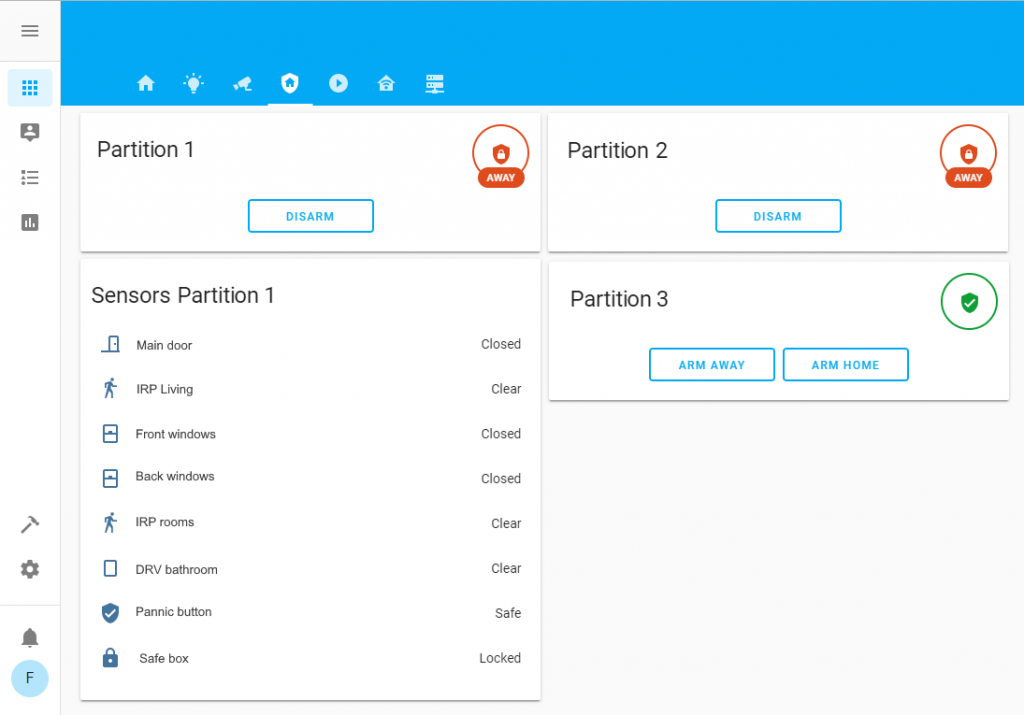
These steps ensure that the device publishes the necessary information to the MQTT broker for Home Assistant to automatically discover the board and configure the Alarm Control Panel integration, along with sensors for zones, trouble, and Wi-Fi signal strength.
After doing this, if you navigate to “Developer Tools” on Home Assisant and browse the “STATES” tab, you will find entities like “alarm_control_panel.security_partition_X”, “binary_sensors.zone_X”, “binary_sensors.trouble” and “sensor.wifi_alarm”
Finally, the last task remaining is to adjust the Home Assistant front end to show these components according to your preferences.
Using Coiaca’s MQTT broker (not recommended)
The primary reasons for discouraging the use of an MQTT broker outside your network are:
- Security: While connections between the device, the broker, and the automation system can be secure, utilizing the public network is inherently less secure than remaining within a local network. Moreover, when the server is situated in a cloud environment and operates as a shared resource for multiple users, it is always susceptible to potential attacks, which could lead to security breaches.
- Internet service dependency: When utilizing an internet connection to communicate with the MQTT broker, any disruption in connectivity will render devices reliant on this server uncontrollable until internet service is restored.
For integrating with Home Assistant using Coiaca’s MQTT broker you shout configure the alarm Access Code (PIN) on the device.
1 – connect to the device in AP mode and access the configuration screen
2 – Scroll down to the “Alarm Configuration” section and fill the “Access Code” field. This is the PIN used to arm or disarm the alarm system.
TIP: While it’s not mandatory and you can use the same PIN you use manually on the keypad, it's a good practice to configure a new user code on the alarm system specifically for use with the bridge. This allows to differentiate the usage on the alarm system log.
3 – After entering the Access Code (PIN), scroll down and click the Apply button to save the configuration changes and make the device restart.
Next, you should install and configure the Home Assistant MQTT integration, following the instructions below: (more information can be found in this article: https://www.home-assistant.io/integrations/mqtt/) ![]()
- Browse to your Home Assistant instance.
- Go to Settings > Devices & Services.
- In the bottom right corner, select the “Add Integration” button.
- From the list, select MQTT.
- Follow the instructions on screen to complete the setup. When prompted to enter MQTT broker information, use the following:
- Broker: mqtt.coiaca.com
- Port: 8883 for secured connection or 1883 for unsecured connection.
- Username: the one you received via email after completing the device registration process (In the table enclosed in the email you will find: Parameter: Coiaca MQTT broker username, Value: 8 digits alphanumeric)
- Password: the one you received via email after completing the device registration process (In the table enclosed in the email you will find: Parameter: Coiaca MQTT broker Password, Value: 16 digits alphanumeric)
- Client ID: leave empty.
- Keep alive: 60
- Use a client certificate: disabled
- Broker certificate validation: Auto
- MQTT protocol: 3.1.1
- MQTT transport: TCP
- Click NEXT
- Enable discovery: enabled
- Discovery prefix: the one you received via email after completing the device registration process (In the table enclosed in the email you will find: Parameter: Home Assistant MQTT Discovery Topic prefix, Value: 8 digits alphanumeric)
- Enable birth message: enabled
- Birth message topic: Discovery prefix + /homeassistant/status (Ex. ABCDEFGH/homeassistant/status)
- Birth message payload: online
- Birth message QoS: 0
- Birth message retain: disabled
- Enable will message: enabled
- Will message topic: Discovery prefix + /homeassistant/status (Ex. ABCDEFGH/homeassistant/status)
- Will message payload: offline
- Will message QoS: 0
- Will message retain: disabled
- Click SUBMIT
This configuration will make Home Assistant to connect to Coiaca’s MQTT broker, retrieve the necessary information to automatically discover your board and configure the Alarm Control Panel integration, along with sensors for zones, trouble, and Wi-Fi signal strength.
After doing this, if you navigate to “Developer Tools” on Home Assisant and browse the “STATES” tab, you will find entities like “alarm_control_panel.security_partition_X,”, “binary_sensors.zone_X”, “binary_sensors.trouble” and “sensor.wifi_alarm”
Finally, the last task remaining is to adjust the Home Assistant front end to show these components according to your preferences.
Manual configuration
MQTT Alarm Control Panel manual configuration has been deprecated on current stable Home Assistant version. Please, consider manual configuration for old Home Assisant versions only.
Manual configuration requires parameters to be configured on Home Assistant but also on the device.
On the device
You need to configure the BRDSC01 to connect to your MQTT broker. For doing so, connect to the device in AP mode and access the configuration screen. Under the MQTT Config section specify the following parameters:
– MQTT server URL: The URL or IP address of your MQTT broker. If you are using the build in Home Assistant broker, this is the same address of your Home Assistant.
– MQTT server port: Is the port MQTT broker listens for TCP connections (Usually 1883 for unsecured conections and 8883 for secured connections.)
– Is Secure port: Whether connection is secured or not. (TLS v1.2)
– MQTT user: The username for connecting to MQTT server. This parameter is optional since some brokers may not require it. If you are using the build in homeassistant broker, this parameter is usually “homeassistant”
– MQTT password: The password for connecting to MQTT server. This parameter is optional since some brokers may not require it. If you are using the build in homeassistant broker, this parameter is the legacy API password.
– MQTT Client ID: Is the unique identifier that the device will use to connect to the MQTT broker. Is recommended not to modify this parameter.
– MQTT Retain: 0 for disabled.
– MQTT QoS: 0.
Additionally, in the Alarm Configuration section, the Access Code parameter needs to be configured. This is the PIN used to disarm the DSC Alarm system.
TIP: While it’s not mandatory and you can use the same PIN you use manually on the keypad, it's a good practice to configure a new user code on the alarm system specifically for use with the bridge. This allows to differentiate the usage on the alarm system log.
Now, scroll down to the bottom of the screen and press the Apply button to save the changes and make the device to reboot.
On Home Assistant
MQTT Alarm Control Panel, Sensors and Binary Sensor components are used to integrate Coiaca BRDSC01 to Home Assistant.
Is required that you have the MQTT integration ![]() configured properly and your MQTT broker is up and running.
configured properly and your MQTT broker is up and running.
For each partition to be controlled, an mqtt alarm_control_panel component should be configured.
MQTT messages payloads for disarming, arming home (stay) or arming away are D, S, A respectively, preceded by the partition number. For instance, the command for disarming partition 1 is 1S.
Systems with only one partition should be configured as Partition 1
The following is an example of the configuration.yaml file:
mqtt:
  - alarm_control_panel:
      name: "Partition 1"
      state_topic: "DSC01xxxxxxxxxx/Partition1"
      command_topic: "DSC01xxxxxxxxxx/cmd"
      availability_topic: "DSC0xxxxxxxxxx/Status"
      payload_disarm: "1D"
      payload_arm_home: "1S"
      payload_arm_away: "1A"
  - alarm_control_panel:
      name: "Partition 2"
      state_topic: "DSC01xxxxxxxxxx/Partition2"
      command_topic: "DSC01xxxxxxxxxx/cmd"
      availability_topic: "DSC010000000001/Status"
      payload_disarm: "2D"
      payload_arm_home: "2S"
      payload_arm_away: "2A"
For displaying trouble zones statuses, a binary sensor should be configured for each, and a sensor for wifi signal strength. configuration.yaml file should look as follows:
mqtt:
binary_sensor:
- name: Trouble
state_topic: "DSC01xxxxxxxxxx/Trouble"
device_class: "problem"
payload_on: "1"
payload_off: "0"
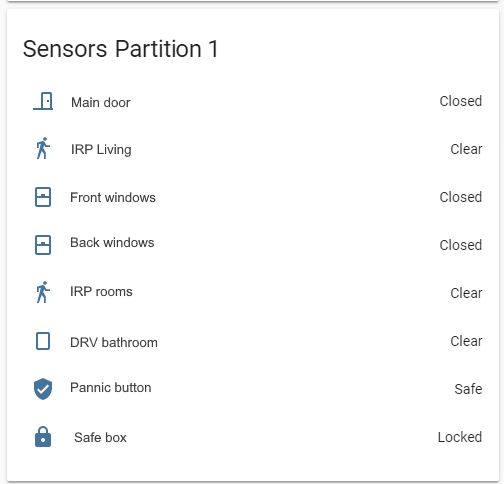
- name: Main Door
state_topic: "DSC01xxxxxxxxxx/Zone1"
device_class: "door"
payload_on: "1"
payload_off: "0"
- name: IRP Living Room
state_topic: "DSC01xxxxxxxxxx/Zone2"
device_class: "motion"
payload_on: "1"
payload_off: "0"
sensor:
- name: Wifi Signal Strength
state_topic: "DSC01xxxxxxxxxx/keepAlive"
device_class: "signal_strength"
unit_of_measurement: "dBm"
value_template: "{{ value_json.dBm }}"
availability_topic: "DSC010000000005/Status"
You should replace “DSC01xxxxxxxxxx” with the deviceID of your unit. Consider to ass a unique_id for each entity to allow management from Home Assisant UI.
Finally, the last task remaining is to adjust the Home Assistant front end to show these components according to your preferences.
Related:
– Registering your BRDSC01 Device and Getting sarted.
– Configuring BRDSC01 devices.
Back to Documentation index page